 CloudPe is now live in Mumbai,
 Load balancing improves the performance and reliability of web applications by sharing incoming traffic across multiple virtual machines (VMs) in a group.
The load balancer takes incoming requests and sends them to the best available VM, using a set of rules called a balancing algorithm and checking the health of each VM. This ensures your application runs smoothly and stays online even if some VMs face issues.
Creating load balancers
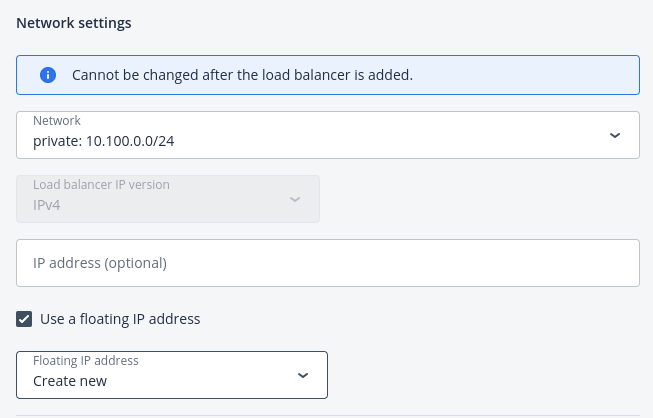
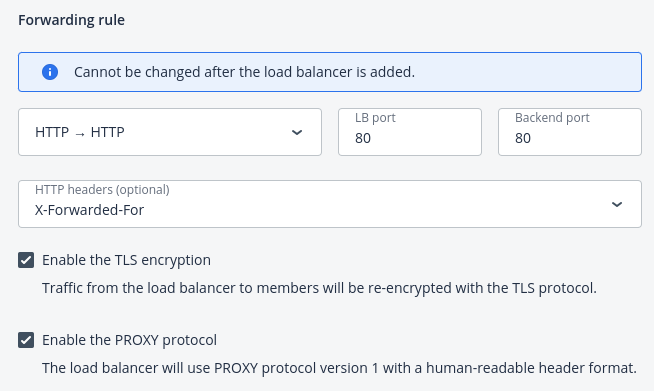
A network where a load balancer will operate has IP management enabled. All VMs that will be added in balancing pools have fixed IP addresses. The forwarding rule and protocol cannot be changed after the load balancer pool is added.
To create a load balancer with balancing pools
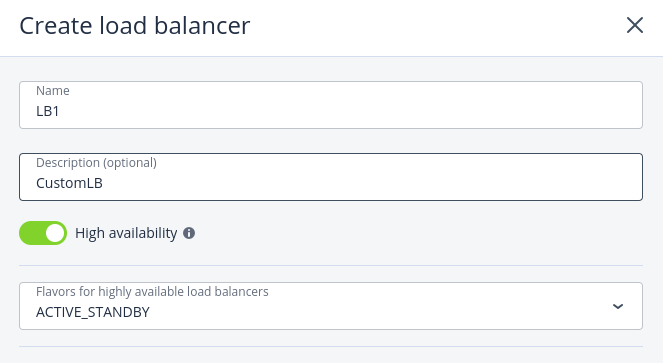
- Go to the Load Balancers Screen. Click Create Load Balancer to start.
- Give your load balancer a name and, optionally, a description.
- High Availability (Optional)
- Enable High Availability: Creates two instances (active and standby) that automatically switch if one fails.
- Disable High Availability: Creates a single load balancer instance.
- Select a Flavor:
- With High Availability: Choose a flavor that supports two instances (active/standby).
- Without High Availability: Choose a flavor for a standalone instance.
- Network Settings:
- Select the network where the load balancer will operate.
- Optionally, specify an IP address for the load balancer.
- Select the Use a floating IP address checkbox if you need to expose the service to the public, and then choose to use an available floating IP address or create a new one.
- Create a Balancing Pool
Balancing pools distribute traffic from the load balancer to your virtual machines (VMs).
Steps:
a) Forwarding Rule: Choose how the load balancer should forward traffic:
HTTPS -> HTTPS
HTTPS -> HTTP
HTTP -> HTTP
TCP -> TCP
UDP -> UDP
b) Balancing Algorithm: Select a method to distribute traffic:
- Least Connections: Sends traffic to the VM with the fewest active connections.
- Round Robin: Distributes traffic evenly across all VMs.
- Source IP: Sends all requests from the same IP address to the same VM.
Sticky Sessions (Optional): Keeps users connected to the same VM by using a cookie. This feature is unavailable in SSL passthrough mode.
c) Add Members:
Add VMs to the pool by clicking Add Members. Only VMs connected to the selected network can be added.
d) Allowed CIDRs:
Limit access to specific IP ranges using CIDR format:
- To limit traffic from the IP address 10.10.10.10, add the /32 suffix: 10.10.10.10/32.
- To limit traffic from the subnet range 10.10.10.0–10.10.10.255, add the /24 suffix: 10.10.10.10/24.
- To limit traffic from the subnet range 10.10.0.0 – 10.10.255.255, add the /16 suffix: 10.10.10.10/16.
e) Set Up Health Monitoring:
Health monitoring ensures that only healthy VMs receive traffic. Choose a Monitoring Protocol:
- HTTP/HTTPS: Checks for a 200 response from the VM. Specify the URL path to monitor.
- TCP/UDP: Checks the connection on the backend port.
- PING: Checks the VM’s IP address.
Customize Health Check Parameters (Optional):
By default, a VM is removed after failing 3 checks at 5-second intervals and re-added after passing 3 checks.To modify these settings, click Edit Parameters, adjust values like intervals and thresholds, and save changes.
f) Click Create to finish setting up your load balancer.
Monitoring load balancers
To monitor performance and health of a load balancer
Open the Overview tab on the load balancer right pane. The following charts are available:
Members state
The total number of members in the balancing pools grouped by status: “Healthy,” “Unhealthy,” “Error,” and “Disabled”.
Network
Incoming and outgoing network traffic.
Active connections
The number of active connections.
Error requests
The number of error requests.
Modifying and Deleting Load Balancers
To edit the name or description of a load balancer
- On the Load balancers screen, click a load balancer you want to edit.
- On the load balancer right pane, click Edit.
- In the Edit load balancer window, modify the name or description, and then click Save.
To disable or enable a load balancer
- On the Load balancers screen, click a load balancer you want to change.
- On the load balancer right pane, click Disable or Enable, depending on the load balancer’s current state.
To remove a load balancer
- On the Load balancers screen, click a load balancer to delete.
- On the load balancer right pane, click Delete.
- Click Delete in the confirmation window.